
This article provides a quick setup guide for Platform9 Managed Bare-Metal (PMB). If you are new to PMB, we recommend starting with Platform9 Managed Bare Metal Overview and Platform9 Managed Bare Metal Architecture first. PMB transforms your bare metal physical servers into a fully automated, zero-touch bare-metal cloud that is ready to run virtualization, Kubernetes or any other application. This guide is intended to help set up testing or proof of concept environments.
Requirements for Platform9 Managed Bare-Metal
Below is a summary of requirements to deploy a proof of concept or bare-metal testing environment.
Bare-Metal Controller
Role: Bare-Metal Controller
Physical or Virtual
OS Linux RHEL/CentOS
Connectivity: Outbound HTTPS connectivity on 443 to platform9.net
Server Requirements:
CPU - 4
RAM - 16 GB
Storage - 120 GB
Networking: 1 NIC attached to the provisioning network
Provisioning Network
Role: A dedicated flat network for bare-metal node orchestration utilizing IPMI
Bare-Metal Nodes
Role: Target physical servers to be part of the bare-metal cloud
1 to 3 physical servers
Server Requirements:
CPU - 4
RAM - 16 GB
Storage - 120 GB
Networking: 1 NIC attached to the provisioning network
Application and Operating System images
Requirements for Integrating Bare-Metal Cloud with PMK or PMO
Number of Servers: 1-3 physical servers configured (3 Recommended)
CPU: Minimum 8 Physical Cores (Recommended 2 Physical Sockets, 8 Cores Each)RAM: Minimum 16 GB, (Recommended 32 GB)
Storage: Minimum 100 GB, (if Virtual Kubernetes Machines are run utilizing local storage, the recommended size is 1 TB)
Two physical servers; one to function as a bare-metal Controller and one to test the bare-metal cloud discovery and orchestration
Networking Requirements for Provisioned Servers
A provisioning network without DHCP enabled, with a reachable subnet gateway IP
A NIC on each server attached to the dedicated provisioning network, with PXE Boot enabled
A management network with outbound connectivity on port 443 where access to platform9.net has been confirmed
A second NIC on each server attached to the management network
Supported OS s
CentOS 7+ (64-bit)
RHEL 7+ (64-bit)
Ubuntu LTS 18.04 (64-bit)
Ubuntu LTS 20.04 (64-bit)
Overview of Bare-Metal Deployment Steps
Sign up and login to the Platform9 SaaS Management platform
Configure the target physical servers and physical network
Ensure both PXE Boot and IPMI 2.0 is supported and configured across all physical servers. Ensure the required IPMI credentials are available
Provision a bare-metal Controller as host with at least 2 NICs and then install a supported OS (e.g. CentOS/RHEL 7.6)
From the host bare-metal Controller, validate connectivity to the Platform9 SaaS management plane on port 443
Document the following network settings:
Provisioning Network Subnet
Gateway IP Address
DNS Domain
DNS Forwarding Addresses
Bare-metal IP Address
Complete the bare-metal Controller Linux preparation steps, and then set up the network bridge and Open vSwtich configurations for the provisioning and management networks
Log into Platform9 and start the bare-metal onboarding wizard:
Configure the physical network properties
Download & Run the bare-metal Agent Software
Configure the bare-metal Controller Properties, ensuring the correct networks are configured for management and bare-metal cloud provisioning
Configure the Provisioning Network subnet, ensuring the subnet allocation pool doesn’t overlap the bare-metal Controller IP
Copy the OpenStack RC prompt and execute on the bare-metal Controllers
Copy and run setup-ironic on the bare-metal Controller
1. Prepare the Bare-Metal Controller
The bare-metal Controller software components can be installed into RedHat Enterprise Linux 7.6 or CentOS 7.6. Once the OS is installed, prepare it by running the following commands (the commands below will ensure the bare-metal Controller host is correctly configured prior to the installation of the Platform9 HostAgent).
2. Bare-Metal Onboarding Setup
To create a bare-metal cloud, the first step is to complete the onboarding wizard. On logging into the Platform9 SaaS Management Plane, a step-by-step guide will walk through the required setup, starting with the creation of the provisioning network. Onboarding is made up of seven steps, each of which is explained below.
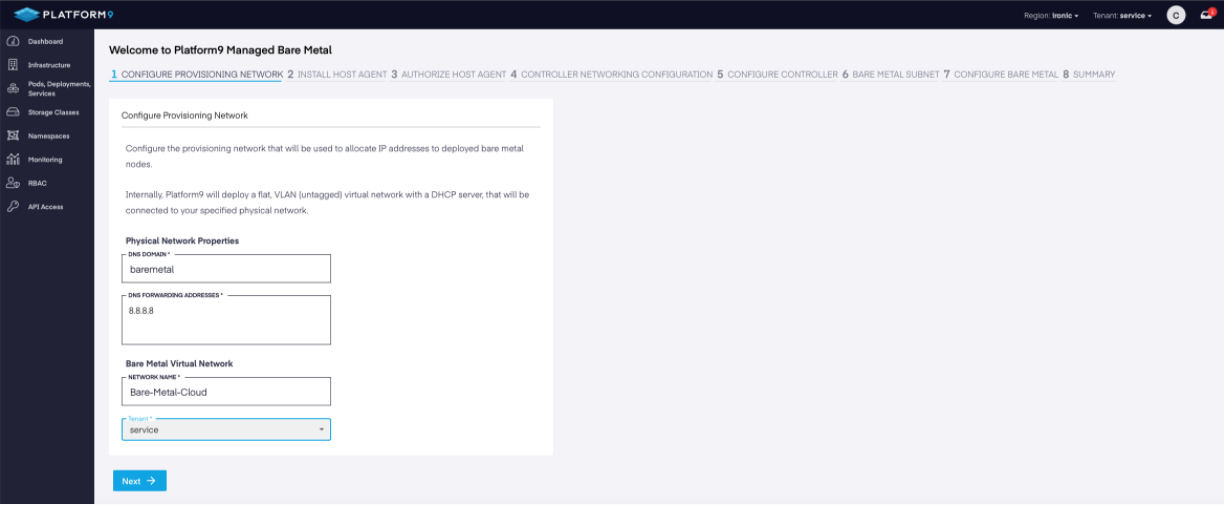
Onboarding Step 1 - Configure the Physical Provisioning Network
Configure the provisioning network that will be used to allocate IP addresses to deployed bare-metal nodes.
Onboarding Step 2 - Download and install the Platform9 HostAgent
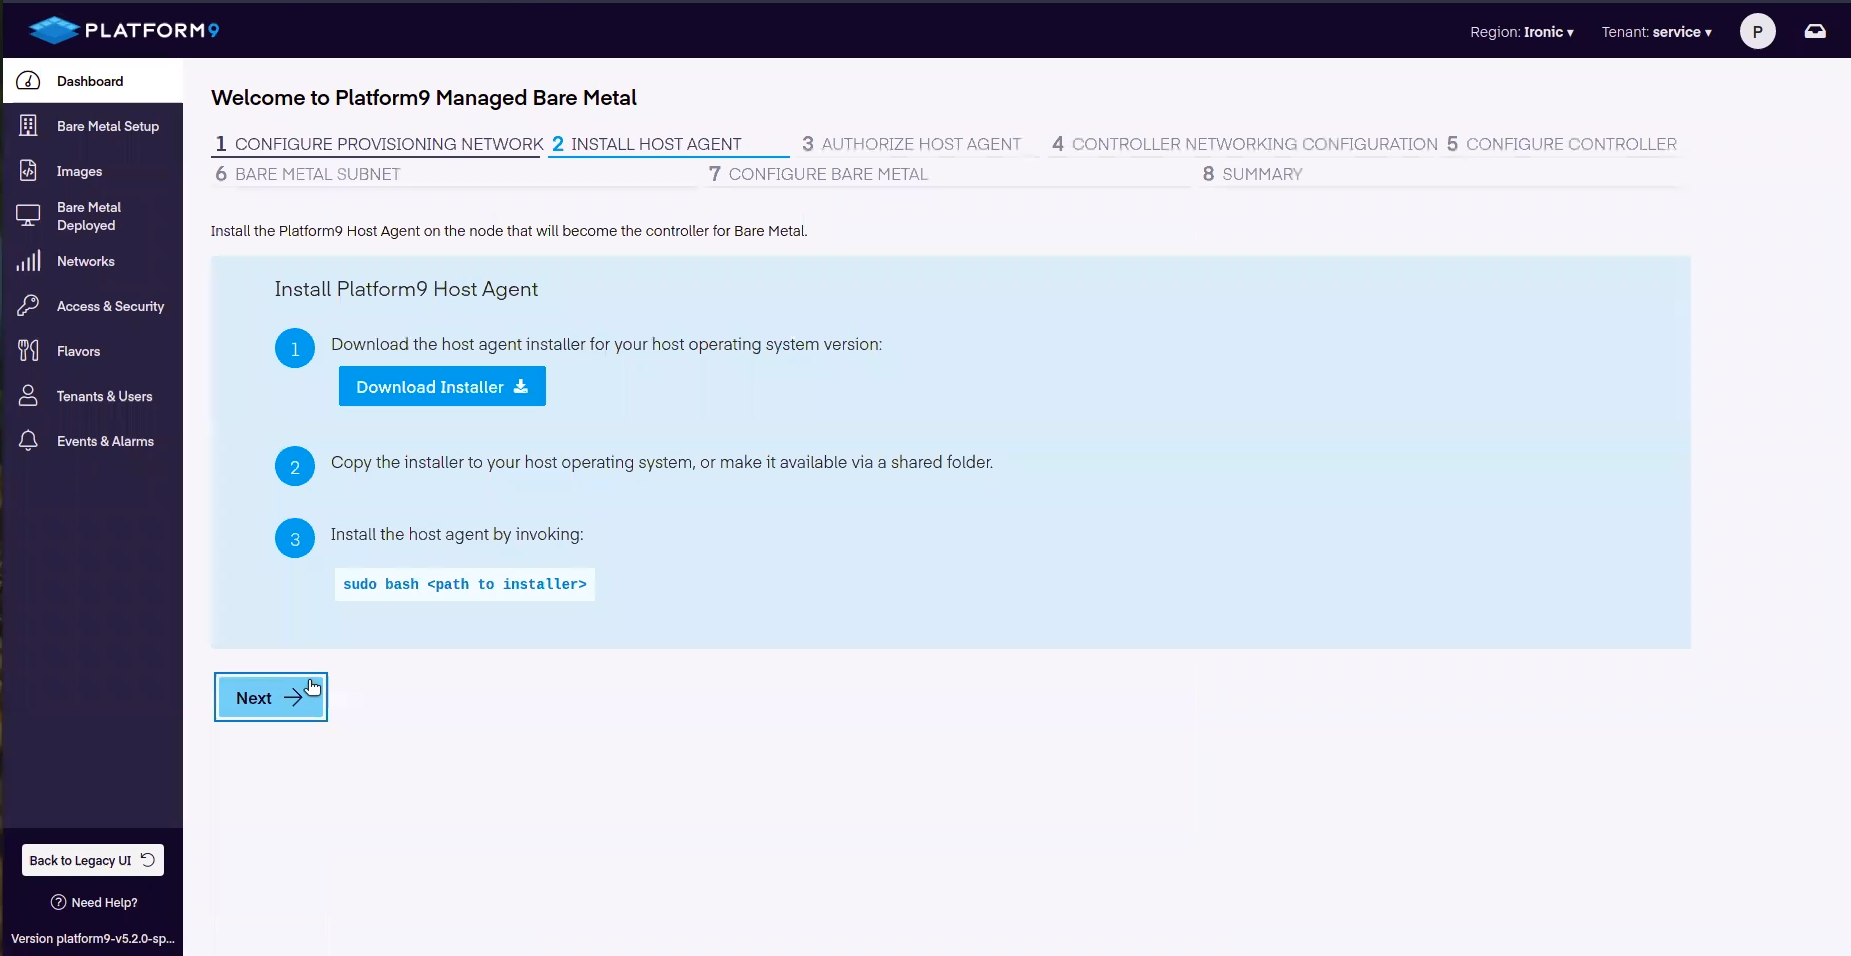
In step two, we download the Platform9 HostAgent and then SCP or FTP the binary to the Controller. The HostAgent will connect the Controller to the Platform9 SaaS Management Plane.
Alternative Download: Direct to Controller
Alternatively, you can pull the Platform9 HostAgent, pf9-download.py directly from our secure GitHub repository, To download the Platform9 Installer from GitHub, run the following curl command.
Once the download is complete, run the pf9-download.py Platform9 Installer using your details. Note the following examples.
Example Account endpoint (users du name): ironic.platform9.net
Example Region: US-West-Ironic
Example User: user@platform9.com
Example Platform: redhat
Full command example:
The platform9-install script contains the required inputs that map to the bare-metal region in your Platform9 setup.
Example: platform9-install-us-mpt1-ironic-redhat.sh
Use No for proxy, Yes for NTP
Then select Yes to install
Once the installation is finished, return to the on-boarding workflow to authorize the Controller.
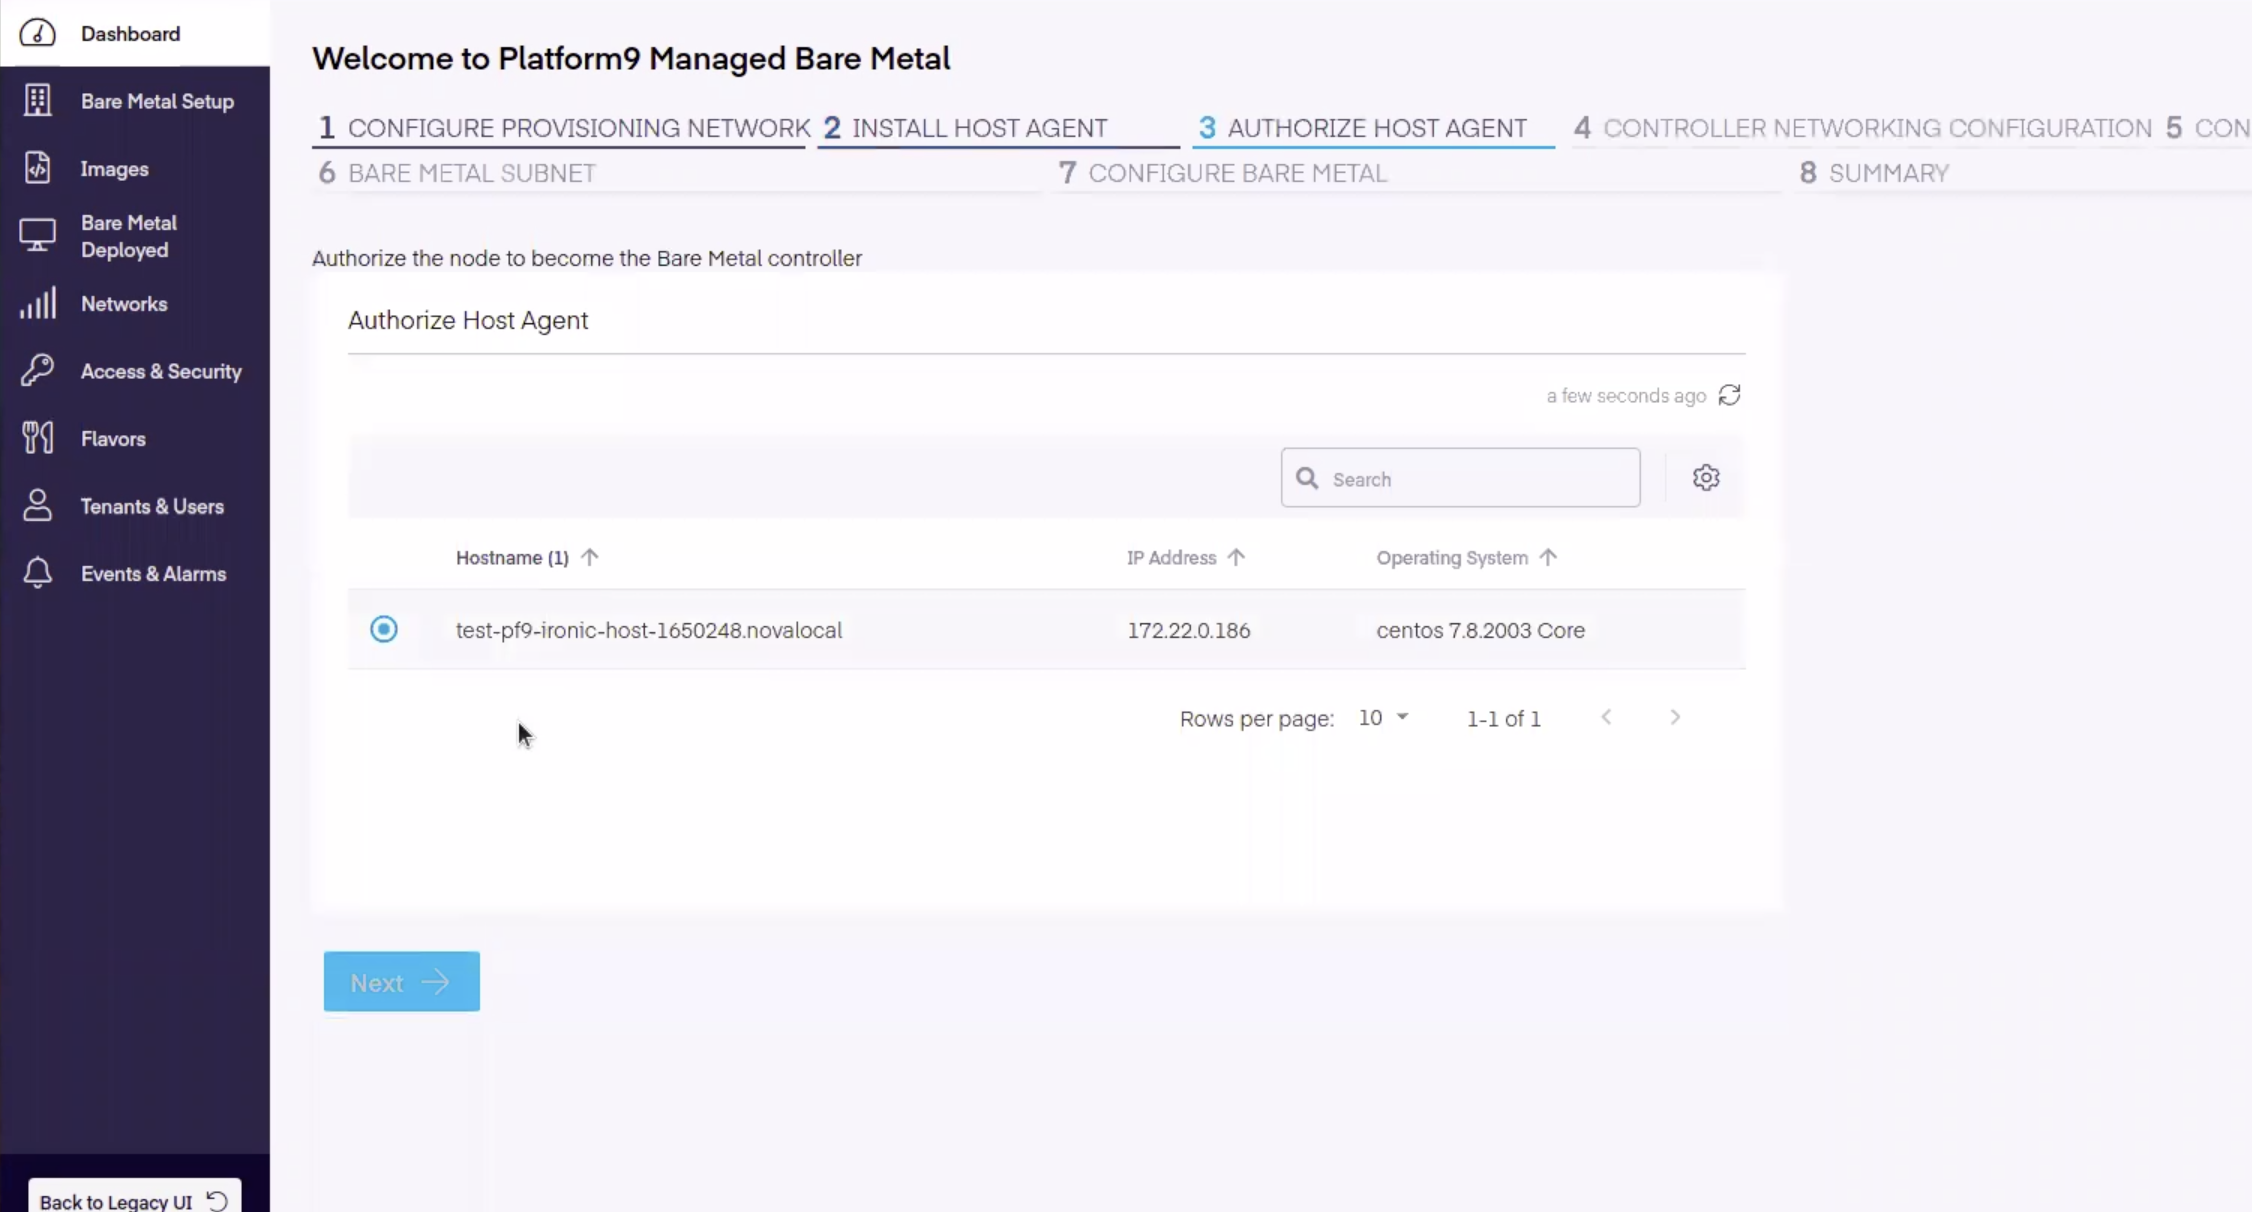
Onboarding Step 3 - Authorize the Platform9 HostAgent
Next, select the host to authorize / onboard and click Next.
Onboarding Step 4 - Configure Controller Networking
Following option is required to create the controller bridge:
Provisioning Network Interface
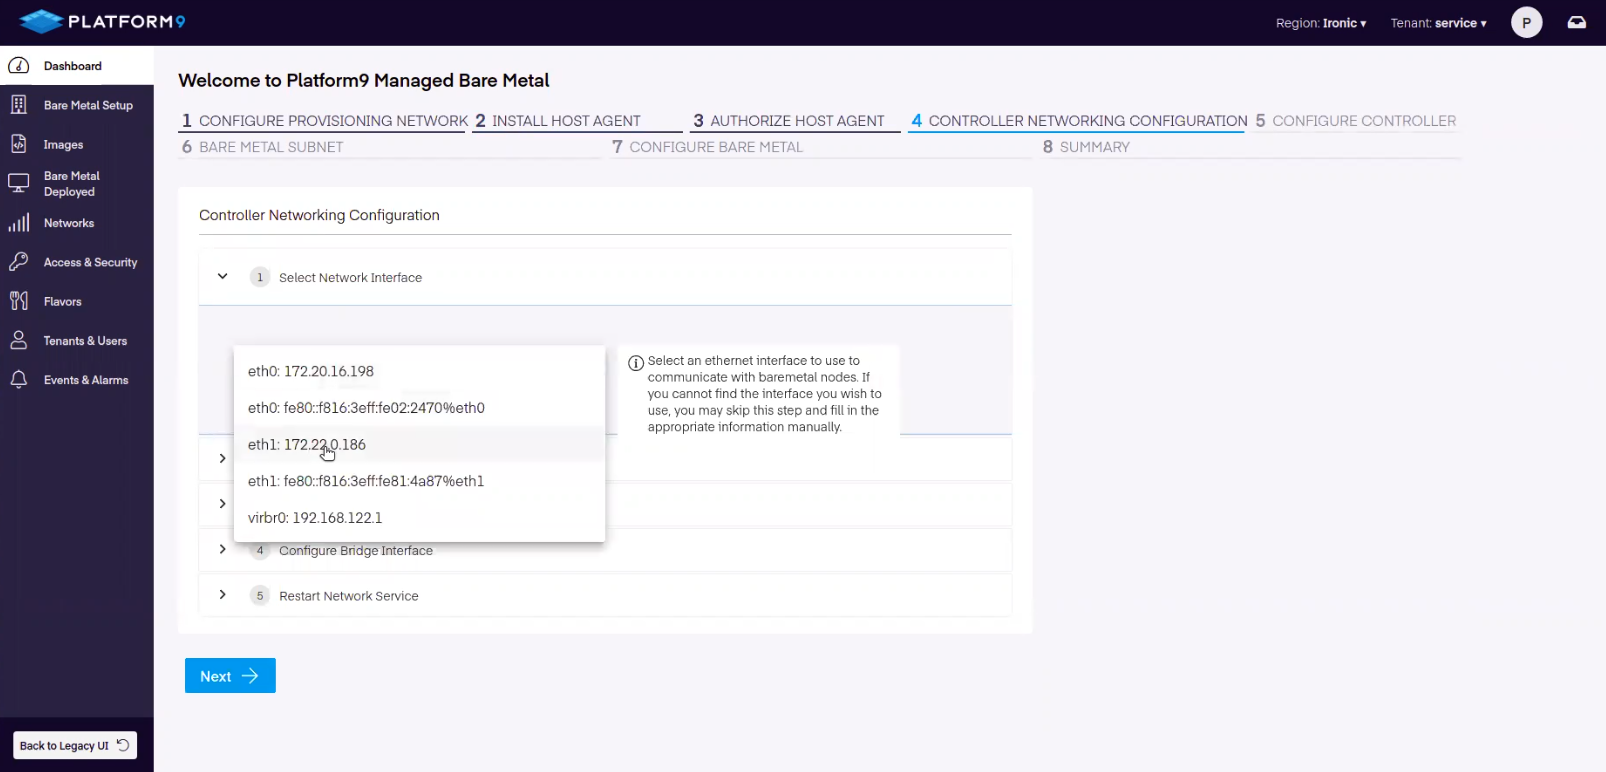
Before running ovs-vsctl commands, you need to wait for a couple of minute for host to get converged.
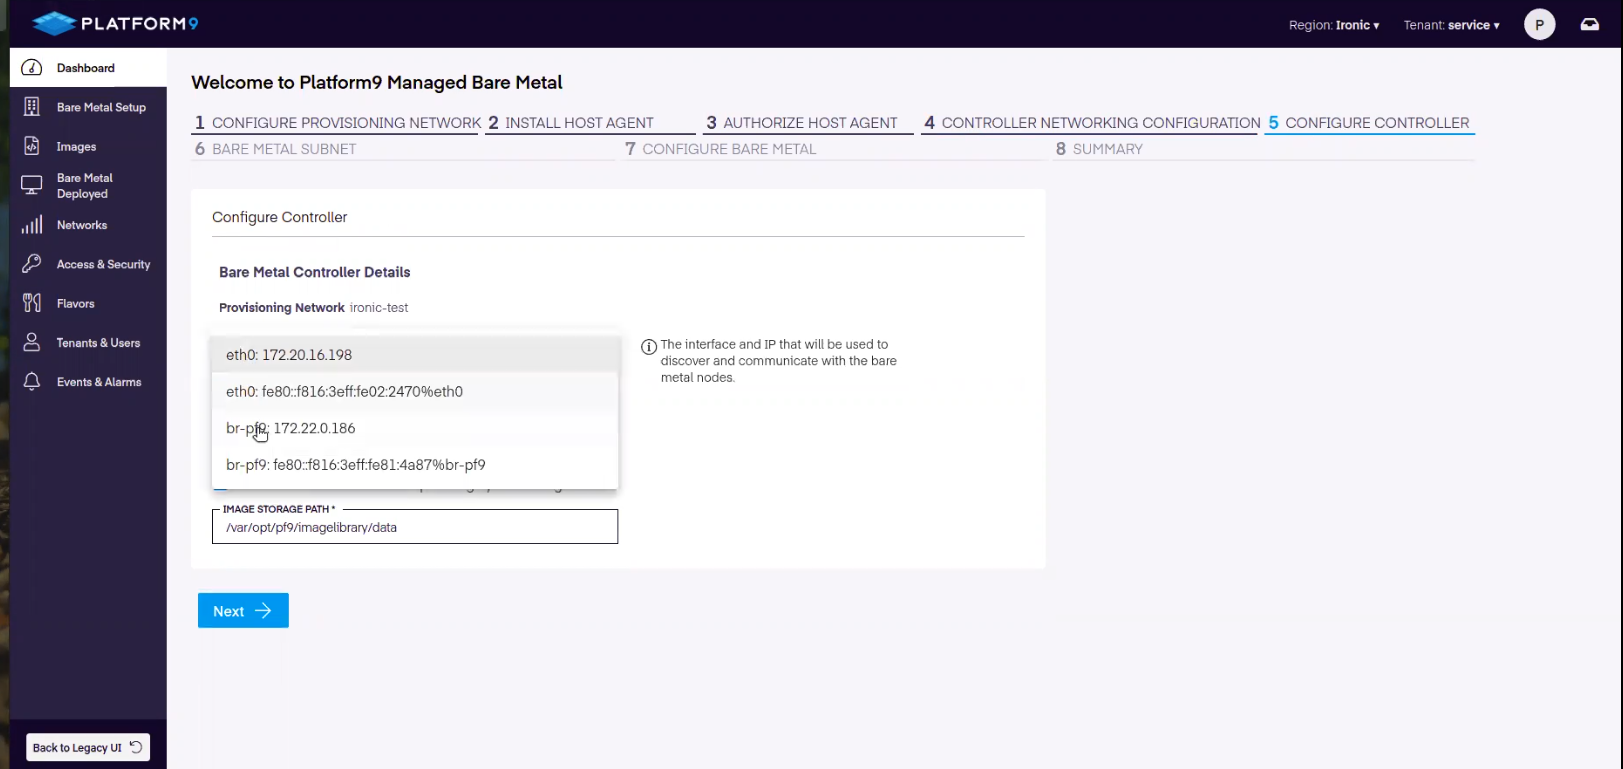
Onboarding Step 5 - Controller Configuration
The Controller needs to be configured to operate on the correct network. To complete the setup, the following inputs are required:
DNSmasq and IP
Bridge Device
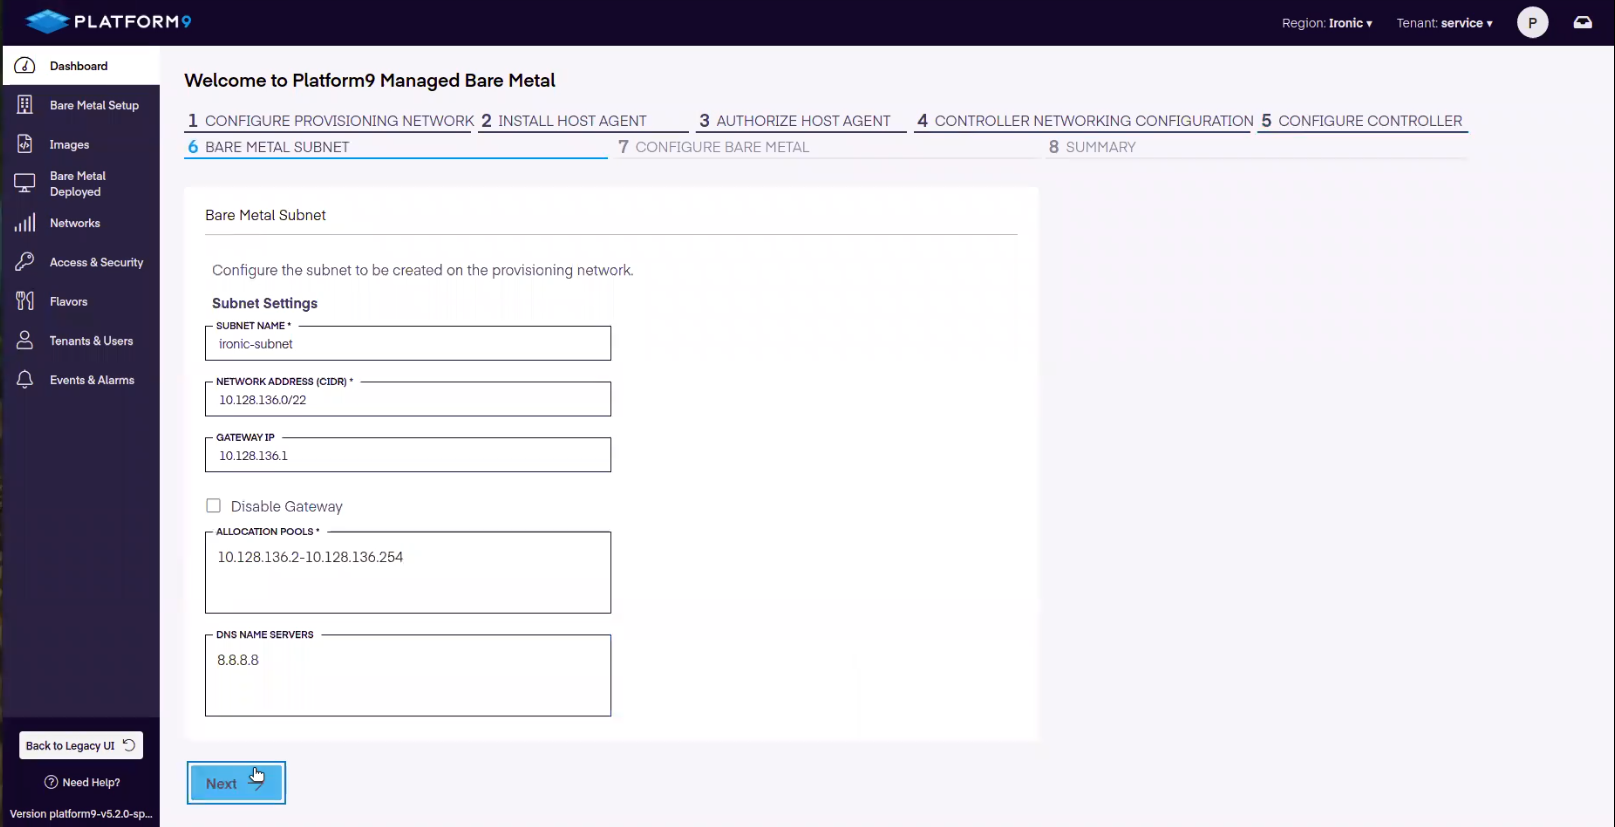
Onboarding Step 6 - Bare-Metal Cloud Network
The next step is to create the network that the bare-metal nodes will be provisioned to. We add this by providing the following information:
Subnet Name
Network Address CIDR
Gateway IP
Allocation Pool
DNS Name Servers
Onboarding Step 7 - Configure Bare Metal
Executing this command will upload the required kernel and ram disk images to Glance that PMB will use to onboard bare-metal nodes.
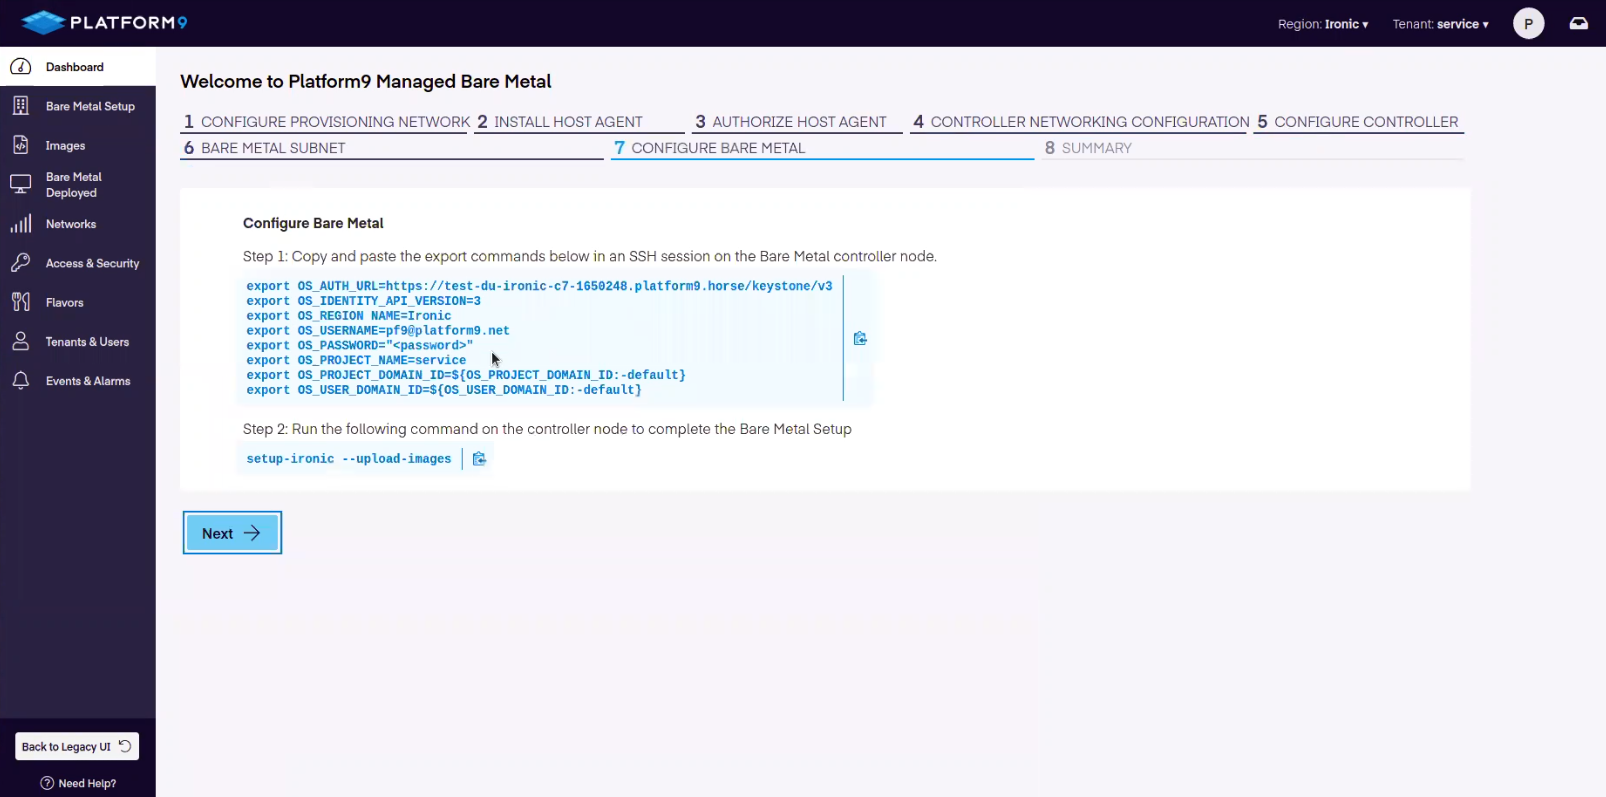
Before running setup-ironic command, make sure the file '/usr/sbin/setup-ironic' exists on the host.
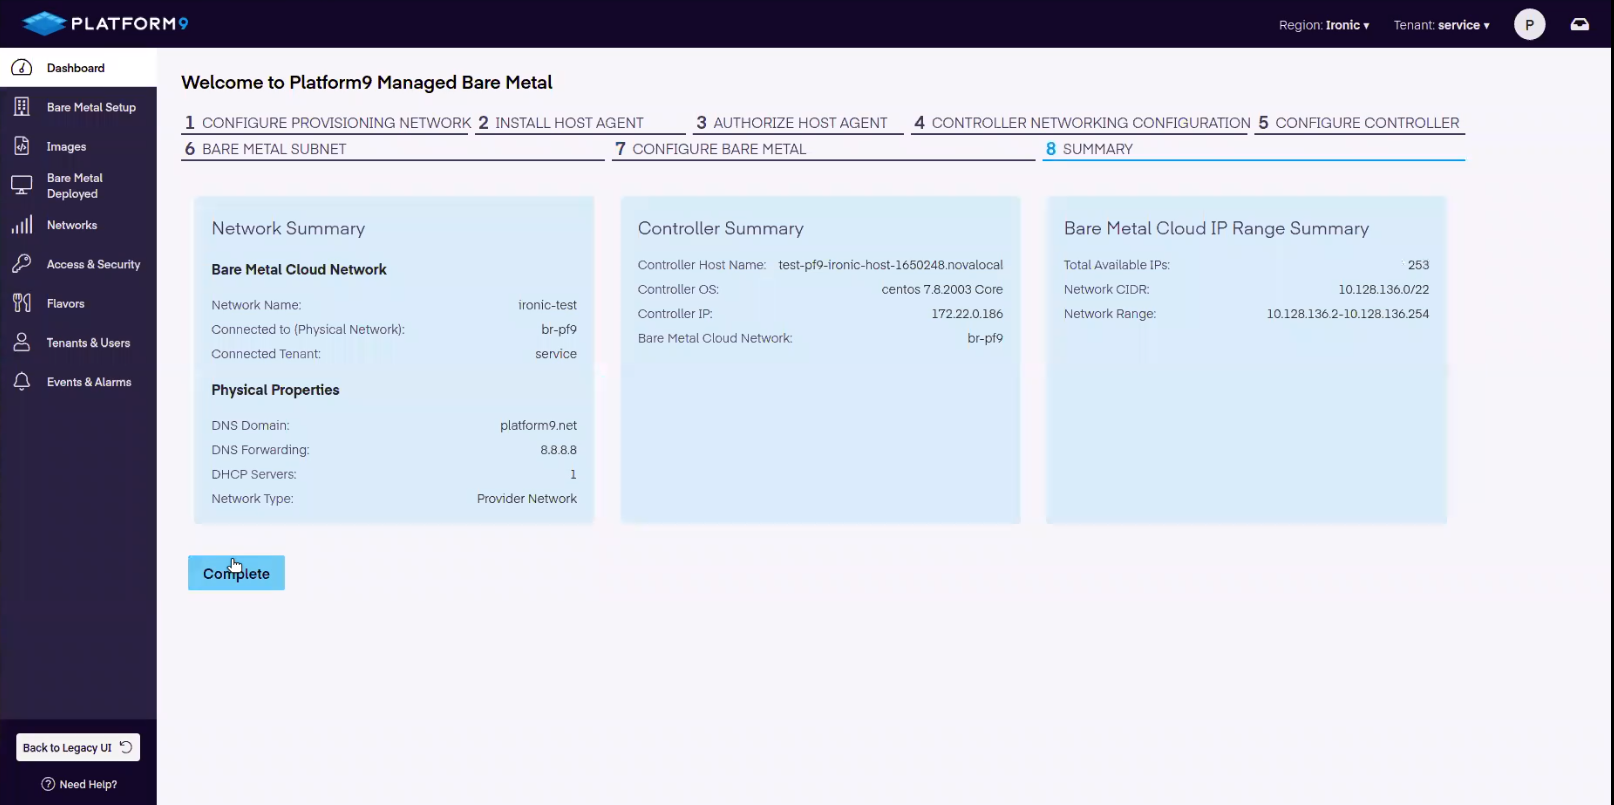
Onboarding Step 8 - Summary and Review
The bare-metal onboarding is now complete. The summary will display the newly configured bare-metal Controller and bare-metal cloud network. If everything looks okay, proceed by adding the bare-metal server(s) to your PMB account.
3. Configure Bare-Metal Inspection
The inspection rules are critical to the proper onboarding of physical servers and allow the auto_discovery to apply specific metadata to the discovered instances. The metadata is useful for creating custom hardware inventory items that can separate out nodes by available capabilities.
To edit the baremetal Controller Inspection Rules, direct network connectivity to the Controller is required.
Alternatively, the inspection rule file may be edited and uploaded directly to the bare-metal Controller via SSH.
Example Custom Inspection Rule
To implement the new inspector rule, run the commands below on the bare-metal Controller
Alternatively, the OpenStack CLI may be used to import the rules.json file.
Next, activate the virtual environment.
Then, run the following OpenStack CLI Commands.
4. Discover and Onboard Physical Servers
The discovery of physical servers is the process that catalogs and identifies the physical server infrastructure that is to be added into the bare-metal cloud. To drive discovery, Platform9 recommends utilizing the IPMI tools that are present on the bare-metal Controller.
Make sure one of the NICs is PXE enabled. Have the IPMI address and credentials ready for your bare-metal node. Ensure the IP address is accessible from the ironic conductor subnet. Finally, check the IPMItool is installed or utilize the bare-metal Controller.
Deactivate Venv
Lastly, deactivate the virtual environment.